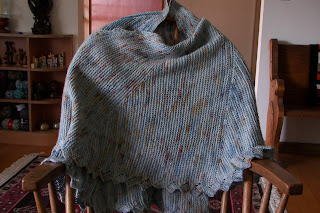
I'm sure all of you know about the Prayer Shawl ministry that has been spreading across religions and the US. People in our church come from many different faith and non-faith backgrounds. Therefore, in our liberal church we recently began a "Comfort" Shawl ministry.
There is something very appealing in knitting a shawl that will wrap someone in comfort, care and warmth. At a time in his/her life when spirits might be low, physical strength might be waning and need for caring is high. I felt very good when I made this shawl, but sad knowing that it will be given to someone in the time of need, illness or great stress.
I stepped in to the Comfort Shawl ministry with great enthusiasm. I know that many comfort/prayer shawls are made of acrylic for ease in laundering. Because I believe that wool from an animal's back is more healing than spun petroleum, I decided to use a machine washable sport weight yarn from Lorna's Laces. The colorway may not be available; I purchased it as a "mill end" from the dying location in Chicago.
I wanted a shawl that would stay on someone's shoulders, so I used the Litla Dimun pattern from Folk Shawls--a Faroese style. by the way, I am very enthusiastic about the Folk Shawls book. I return to it often, to dream and plan and knit.
So, here's the finished shawl, blocking.
The symbol of our church is the "flaming chalice." I thought that the design up the middle panel of the back looked like chalices. Therefore, I added a lace-type flame from one of Barbara Walker's books. It is very hard to see the flame, but the recipient will know that it is there.
Here is the shawl with the patterning from the book.
And here you can see the entire middle back patterning, including the chalice.
I feel good about doing this, even though I don't know who will be the recipient. I hope it will be received in the spirit of sharing and caring.
The shawl was my big project. These Sockotta short socks were my "ziplock bag knitting." I keep a small project in my purse for knitting at stop signs, restaurants, in dark movie theaters and the like. My daughters have convinced me that wearing socks with sandals in the summer is just too out of style to be tolerated! So, I've been making short socks to wear with sandals. I don't know about you, but for some reason my feet are always cold, even in the summer. I think these socks are perfectly stylish, no matter what the muggles think!!
Monday, June 23, 2008
Tuesday, June 17, 2008
Still Stuck on Short Rows
Here it is the middle of June and I am still stuck on short rows. There is something so very soothing and hypnotic about every row being two stitches shorter than the previous row!! And, I had some Lorna's Laces sock yarn just begging to be made into something elegant. And, due to the end of school year rush at our house, garter stitch was about all I could tolerate. No more stress needed in our household when the 11th grader has tests, exams, reports, performances, recitals, SAT's, ACT's and so on and so forth. I am so glad that I am no longer in school and that I'm not a teenager any longer. I firmly believe that our schools expect too much of teenagers in terms of heavy load of homework, extracurricular activities, volunteer work, etc. Horrifyingly, I find that I am no longer surprised when a teenager commits suicide due to pressure; rather, I am surprised that more do not. We expect way to much of our children.
Back go garter stitch and short rows. Once again, Rachel Rocking Chair has volunteered to model my Easy Pie Wedge Shawl.
The mail color is Lorna's Laces pine, from the mill ends available only by visiting the dying facility in Chicago. I'm not sure if the color is available in stores.
I was concerned, unnecessarily so, that I wouldn't have enough yarn to finish the shawl and, therefore, I added a six row inset between each pie wedge, using Colinette's Jitterbug. Although the color of the camera is poor, the lime green really sets off the darker green--in my humble opinion.
Also, because I used only 100 stitches for the longest row in each wedge, rather than the 120 that I used in my previous pie wedge shawl, I was concerned that the shawl would not be wide enough to wrap elegantly. Therefore, I made 8 wedges, about 2/3 to 3/4 of the complete circle. this made for great drape.
Rachel Rocking Chair is about a wide as I am, but not as thick (shall we say) and the shawl still has a nice drape on me too.
I love the scalloped/pointed edging that is knitted into the shawl.
I seem to be at a point in my life these days when I need to knit simple things. Life is going too fast, my husband is too cranky, there is too much gardening that needs to be done, the flooding in Wisconsin and Iowa is so disastrous and worrisome, we are about to embark on a 2.5 week vacation (about 1.5 weeks too long in my estimation) and my soul needs simplicity. I bow to those of you who can knit intricate lace to relax. I find that I need peace in order to work on complex knitting.
I recall studying Maslov's hierarchy of needs in some psychology class ages ago. He posited that higher order thinking and creativity could not be accomplished unless certain basic human needs were met. In times of stress, I think that I revert to easier knitting because it soothes my soul and permits me to "veg" rather than think. Something I need these days.
Monday, May 05, 2008
Stuck on Short Rows
Since my last post spring has come to Wisconsin. Typical spring, that is. Some days with temperatures in the 60's and sunshine. Some days with temperatures in the 40's with grey skies and rain. All in all, still weather for comfy shawls.
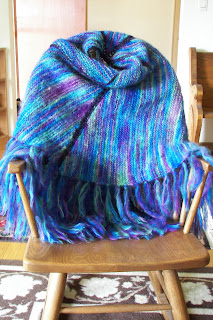
The Easy Pie Wedge Shawl that I made last month has been very popular with knitters and non-knitters who see me wearing it. The photos of the shawl that I posted were not very good, so here is the famous model, Ms. Rachel Rocking Chair, sporting the shawl in a jaunty fashion!
Rachel here wears the shawl in devil-may-care fashion without any pin to hold the end on the shoulder. I, on the contrary, like to secure the shawl end with an understated blue stitch holder, on the shoulder, to keep myself together!! (Pattern was free on the band for Lorna's Laces Helen's Lace, but $4.50 here.)
For some reason, the rhythm of the short rows simply mesmerized me. Ordinarily, I'm not very entranced with garter stitch. However, the short rows were easy but seductive. So, I set out to use some mohair that has been in my stash for at least 8 years.
[I was in high school in the 60's, when v-neck cabled mohair sweaters were all the rage. I didn't have enough money to purchase one of those sweaters, so I've been compensating for my deprivation ever since. I have an entire of mohair! One hank has been calling to me but I never had the right pattern for it. Ellen's Half Pint Farms Brushed Mohair (one pound) in Northern Lights colorway. I once saw the Northern Lights while camping in Ontario, while floating in a river at night. thus, the blues, purples and greens were like a Siren song. ]
The pattern was another short row half-circle from Fiber Trends, Marvelous Mohair shawls and blankets. Each wedge of this mohair "pie" uses short rows going up to the maximum number of stitches and then going down, making a full pie slice. The previous shawl only made half of a slice, so to speak.
Ms. Rachel R. C. has again volunteered to model.
Rachel didn't like the flash of this photo.
So, here's a photo without flash. A little better. The shawl will be worn with my black winter coat, which is a wrap coat, unlined and uninsulated. Here in Wisconsin we need warmer winter wear, but I love the very simple black coat. So, I figured, rather than a scarf, I would wear a shawl over the coat. To make sure that the shawl would wrap sufficiently in front to keep out the very cold Arctic winds here in Wisconsin, I made five wedges, rather than the called-for four. This, I have 5/8 of the pie, rather than half!
Each pie wedge is set off by a yarn over inset that used Colinette's Jitterbug sockyarn, in a very deep plum color. I thought this would set up the glorious colors of the mohair, just as black sets off the glorious colors of traditional Amish quilts.
Here's the back.
I'm still not over the short rows. I'm making another Easy Pie Wedge Shawl using Lorna's Laces shepherd sock yarn in Pine green and some Claudia's Hand Paint (or is it Fleece Artist??) for the insert. Yes, I bought the Lorna's Laces yarn when the Guild's Knitting Safari visited the company in Chicago.
Meanwhile, back at Borders, the Yarn Harlot herself came to entertain us and sell her books. Believe it or not, she is funnier in person than in her blog and in her books! Her story about walking 14 km in the snow and cold of remote Ontario was even funnier when she told it--and I had already laughed out loud when reading her blog about it.
See her if she comes your way. The woman is very, very good and very very devoted to her fans. She sign books and is entertaining even when she should be in bed sleeping!
Thank you Stephanie!!
Tuesday, April 29, 2008
I am a simple woman
As the Yarn Harlot said last night at Border's, knitters are an inconsistent lot. Some like cashmere, some like acrylic--but all are knitters. I find the same inconsistencies in myself. Earlier this year I was totally distraught when I learned that production of Tiur had ended. I scoured the country to accumulate enough Tiur in the correct colors to make about 7 or 8 Dale of Norway sweaters. One would think that by now I would have completed at least two of them.
But no, it turns out that I am a simple woman--not a stupid woman, not an "easy" woman, mind you, but a plain woman. I have been bewitched by short rows and garter stitch.
It all began with a visit to my favorite LYS where a beautiful functional shawl was on display, casually but every so elegantly draped around a manikin. Made out of 8 skeins of Koigu KPPM. Made from a simple short row garter stitch pattern from the ball band of Lorna's Laces Helen's Lace. I had to have it. That manikin looked so very elegant. Wouldn't I look equally elegant?? But, Koigu is a little "spendy" as my father would say. So, I purchased three skeins of Rio de la Plata sock yarn from Uruguay. Less than half the cost of the display model.
And, I made it in about a week. And, I wear it all the time. And, I get compliments on it every time I wear it, even from non-knitters.
Don't you love those cute little serrated edges?? Knit into every row. None of this pick up stitches and knit on later. When you cast off the last stitch you are DONE!
The lighting was bad, but you can get the idea of the swirls of the short rows.
More short row swirls.
Two weeks ago our Guild went to Lorna's Laces Yarns for a tour. Oh my. We all wanted to steal everything in sight. Of course, knitters are an honorable bunch and we only looked, and salivated.
We managed to score some "seconds" which were definitely "firsts" in our opinion.
Tuesday, April 08, 2008
Not Spring!
It is definitely not yet spring here in Wisconsin. I don't have any dreadful photos to post about rain, cold temperatures and the snow that is falling as I write this in the northern part of the state. My daffodils have bravely sent up some green shoots, but with tonights low temperatures, they are wishing they could reduce themselves right back into the ground.
My knitting progress is not much to brag about. While on our spring break tour of colleges for daughter #2, I tried some stash reduction. I had two large skeins of some of Sirdar's wool/acrylic bulky yarn, and I thought I would have a flash of genius for what to do with it.
Something simple, I needed, that I could do in the car while still navigating and that I could do while paying attention at the college introductory presentations. I decided to make a small Linus blanket that would be used as a security item, rather than something used for warmth. For a pattern, I thought I would do a variation on the garter stitch diagonally knit washcloth (k2, yo at the beginning of each row until half the size you want; then, k2, yo, k2tog at the beginning of each row.)
For my variation, I thought I would do sections of reverse stockinette and stockinette stacked on each other--dividing the little blanket into quarters. Can you guess what I forgot? I forgot that garter stitch is square and stockinette stitch is rectangular--taller than it is wide. Thus, the garter stitch wash cloth is square because the rows and stitches are square. Stockinette on the bias using the same k2, yo, etc., at the beginning of each row makes a diamond. NO amount of blocking will turn that kite into a square. It looked a little bizarre, to say the least. I couldn't give that thing to a sick child in the hospital.
So, I purchased some pretty ribbon in different colors, and threaded it through the yo holes.
It's still a diamond, and the ribbon kind of makes it look more like a kite, but I think it's OK. I hope that some sick child will enjoy holding this blankie close, playing with the ribbons and maybe thinking of spring!
Tuesday, March 25, 2008
On the Road with Cat Bordhi
The week before Easter found us (me, hubby and daughter #2 age 16) driving around Indiana, Michigan and Ohio looking at colleges for daughter #2. Daughter remained very positive all throughout the trip, even though she kept checking her "facebook" to check the progress of her friends who were on vacation in Florida, California, the Virgin Islands, Barbados and other warm, sunny, sandy locations. We, on the other hand, had cold and chilly temps and rain. Only one day of sun. But, I digress from knitting.
Fortunately, hubby is the anxious sort and likes to drive. So, I was able to knit. Although I can make the standard sock recipe blindfolded (flap or short row heel) I thought I should stretch my knitting wings and try Cat Bordhi's gusset-less sock from her new book "New Pathways for Sock Knitters." I had a lot of car knitting hours and I wanted a project that was small but interesting.
I chose the cedar architecture and modified the slipped stitch version because I had only one color of sock yarn with me on the trip.
I decided to do slip stitches in the rows after the most intense colors ended--the bright pink, green and blue. Given the color way, I thought that the result was little spring flowers. Although, this may have been a mere fantasy dream of mine, since there were no little spring flowers poking up their heads in Michigan, Indiana OR Ohio!
The sock ended up being quite long because of the placement of the increases for the ankle of the sock. I put a pin where I began the increases--there are four increases every 20 rows!
The number and placement of the increases did not work for my foot and ankle. I have a narrow ankle and heel. Therefore, if you look closely at this photo, you can see the gap of excess fabric in the sock just above my heel. In the second sock, I plan to delay the increases, to put them closer together, and to delete the last row of increases. I also plan to concentrate the increases on the instep of the sock, rather than distributing them around the circumference of the entire sock. We'll see if that works better.
I've not made star toes before, preferring to do a toe that is shaped to my actual foot. However, the star toe on these socks is rather pretty, I thought!
Here's the bottom of the foot flap that is used for the shaping of foot. The blue stripe below the ankle shows how wide the sock is before you begin to shape on the bottom of the foot. This pattern was fun to do as a diversion from the standard recipe. But, it has fit problems for my feet. I'm not sure that I will do this particular architecture again, unless I was making some type of pattern that I did not want to interrupt when working the heel.
Daughter #1 saw the sock and decided that she liked it. It fit her foot better than mine. So, I will make the second sock for her and try another of Cat's patterns for me. Now I know the fitting pitfalls to anticipate and maybe the second pair will be better--for me. The Coriolis architecture is calling!
Daughter #2 and I are happy to be home. Today is her first day back at school. I'm sure she will come home with lots of stories about friends who had relaxing vacations in sunny and attractive locations!!
Tuesday, March 11, 2008
Gluttony
Hello. My name is Gail and I am a yarn-aholic. I joined Ravelry recently and began to catalog and record my yarn. I was in complete denial about the number of bins and number of skeins in my collection. I realized my addiction was out of control when I purchased sufficient Dale of Norway Tiur yarn to make 8 Dale sweaters. As if I didn't already have enough projects for which supplies had been purchased to last a lifetime. Today I neared the end of my cataloging of yarn. I am in the 300's for the number of entries. This does NOT count skeins.
I hereby resolve, with the help of my fiends, not to purchase any additional yarn in 2008 and to knit madly to make a dent in my stash.
Thank you for listening.
See you at the next meeting.
I hereby resolve, with the help of my fiends, not to purchase any additional yarn in 2008 and to knit madly to make a dent in my stash.
Thank you for listening.
See you at the next meeting.
Monday, March 03, 2008
Can't Compete with the Yarn Harlot!
Stephanie, the Yarn Harlot, has been posting wonderful photos of her isolated Canadian snowy retreat. I can't match that for isolation, but we also have snow here in the Midwest US. Here's a shot of non-isolated country side in New Glarus Wisconsin, a town settled by the Swiss and where you can find lots of wonderful Swiss chalets. Our local knitters' guild hosted a weekend of knitting (no lessons, just fellowship and knitting) in a chalet style motel. While we knitted blissfully and fearlessly away, Mother Nature did what she does best here, she snowed!
CNN today has an article about the top 10 places to ice skate.
I beg to differ with them about places to include. Here in Wisconsin we have lots and lots of ice skating ponds--all of them natural. None of these ice sheets poured in the middle of cities and tended by Zambonies. Of course, my favorite ice skating place was the lake in front of one of my childhood homes. The surface was never smooth (unless no snow had fallen after the lake froze and you could see through the clear black ice and watch fish swim underneath!). And we had to shovel the snow ourselves. But we would ice skate while my father ice fished. I don't know that he caught anything....we usually got cold way before the fish bit!
At any rate, Madison Wisconsin has a Currier and Ives style park called Tenney Park. In the winter, the lagoon freezes and the park shelter is given plywood walls to create a warming house and skate rental concession. Oh, you can also purchase hot chocolate. I couldn't find a photo of the skaters, but this photo gives you an idea. When the ice is sufficiently frozen, the parks department sends out a pick up truck with plow and some water hoses to add a smooth surface to the ice. Skaters and hockey players skate under the arched bridges and go into the shelter for hot chocolate. Great fun!! Especially when the shelter is not open and the flood light are not on and you can skate under the stars.
In my last post, I lamented my slow knitting progress, at least as it compares to Stephanie the Yarn Harlot. (Why do I feel such competition with her?? She's younger, driven, etc., etc. Get a grip, Gail!! Chill!!) I thought that maybe I could post photos of items I completed a while ago, to make it look like I've accomplished more than I have recently.
This is the scarf daughter #1 ordered for Christmas. I made the mistake of taking her to a yarn shop and telling her to select yarn for a scarf. She selected some gorgeous nearly cobweb lace weight yarn and said she wanted a wide scarf, about 6 feet long. I used size 2 needles and doubled the yarn. That said, I also used a wrap stitch to make faster progress. Here are some photos. I finished it in mid-January. It was a Christmas present.
I separated the wrap stitches with smaller and larger segments of garter stitch. And used both double and triple wrap segments.
It has a somewhat lacy texture--my daughter said, "Don't bother with lace, I won't notice it anyway." Here, I was thinking heirloom lace, exquisite knitting....
Another reason I can't compete with Stephanie is that I tend to do more stupid things than she does. Rather than stick to my basic sock "recipe", which is the same as her "recipe", although I did NOT copy her, I thought I'd try a short row heel in these socks for my father. I used Lucy Neatby's idea that one should take 60% of the stitches of the leg of the sock. But, I used stockinette instead of garter stitch, as she does, and I achieved a heel that would fit an elephant.
I will save the photo of the finished socks for another post. That way, it will look like I've been knitting like crazy and keeping up with Ms. Y. H. Stay tuned!!
Saturday, February 23, 2008
One for you, one for me
I admit it. I am not among the ranks of the knitting super women. Take Stephanie P-McP. How does the Yarn Harlot do it? I mean, she started her grey cardigan just a few days ago; then abandoned it to make a pair of socks, then finished the cardigan before I could even select my next knitting project!! During this time she flew to Madrona, took classes and gave a speech, took care of 3 teenager daughters and husband, and is working on a gazillion more books no doubt!!
Here at my homefront, where I have only one teenager, am retired but do volunteer work and am equally buried in snow and grey and cold, it was all I could do to finish these: the first ever socks REQUESTED by daughter #2, the 16 year old!!
The yarn is a Kaffe Fasset colorway that Regia came out with recently. I did a k3, p2 ribbing on the entire cuff and leg and the top of the instep. She wears the socks inside of her fake Ugg boots, to school, to keep her feet warm during this the winter to end all winters in the upper Mid-west!! She likes them, the really likes them!!
Now, for me these socks took time. They weren't difficult, but they did take time. Size 2 mm needles, size 8.5 feet. I mean, I didn't knock them off while taking a short breather from a cabled cardigan!
It took me a while to select my next big project. I don't get to make myself a lot of items, since I am now keeping myself, my father, daughter #1 and daughter #2 in handmade socks!! I showed you several possibilities for my perfect project. I didn't select any of them. I went off on a wild tangent.
Did you hear that Dale of Norway has discontinued the production of they fabulous yarn, Tiur?? I didn't. I think I was the last US knitter to learn of this. I panicked. I have had in my mind, for at least 8 years, to make about 8 or so Dale of Norway sweaters for myself in Tiur. I never accumulated the yarn, but I (incorrectly) had faith that the venerable Dale would never discontinue a staple of their stable. My faith was utterly misplaced.
I went on a mission to collect, by hook or by crook, sufficient Tiur to make all the sweaters that were bubbling back in my mind. I collected enough Tiur to make about 8 sweaters. I spent the entirety of my of my 2008 yarn budget. Forget the sewing machine that my yarn diet was accumulating money for.
Here is my first project. I purchased the pattern for this when I visited Norway in 2001. Red is my favorite color. Despite being brunette/grey haired, I think I became convinced that I would look like this model if I made the sweater.
Don't you love that "come hither" look in the model's eyes?? In that warm sweater with cables, color work, embroidery and textured stitches, I will be a sultry, blond 20-something Scandinavian! Forget the Marilyn Monroe and Lindsay Lohan nude photos, I will give them a run for their money in the allure department, dressed in wool/mohair and pointsettia/stars.
It took me longer to do my swatch than it did the Yarn Harlot to start and finish her socks!! Why I worried and did two swatches with two different needle sizes I'll never know. The gauge instructions gave dimensions over stockinette. There is NO area of stockinette in the entire sweater. Be that as it may, I achieved gauge for a stockinette sweater; not that I'm making a stockinette sweater....
So, I started with the sleeve. Turns out that the cuff was too narrow and the sleeve increases too dramatic for my taste. Rip out, start again. Use larger needles for the small needle size. Increase for the sleeve more slowly.
And I finished, one sleeve!! Looks like it will fit!! And, it's for ME!!!! Now, cast on for sleeve #2, and finish the second sock for my father. By the time I finish sleeve #2, Stephanie will have made her next cabled sweater in a more lively color AND made more grape leaves for another pair of Vintage socks for another friend........
We mere mortals slog on.
Saturday, February 09, 2008
Some Assembly Required
Ta, daaaa!!!!
Look at this handsome, proud man. This is my husband wearing his Dale of Norway sweater that I FINALLY finished. Was the finishing painful? Not really. Was it intimidating? Definitely.
Back in 2006 I gave my husband what I thought was a wonderful Christmas present. I gave him a Dale of Norway pattern and invited him to my favorite LYS to select yarn. Well, he didn't like the pattern I selected ("too flowery" ?????). It took several trips to more than one LYS to select the above pattern and yarn. This was a painful process. He finally selected the winning "daring" color combination: navy blue, dark red and grey. Aren't 98% of men's sweaters done in navy blue, dark red and grey?? But I digress.
I shouldn't berate my husband, however, for the long and painful time it took for him to select a pattern and yarn-- it took me nearly two years to knit the sweater!! We who live in glass houses shouldn't throw stones!!
I finished the actual knitting of the sweater just after Christmas. But, somehow, the steek and other assembly intimidated me. I previously suffered traumatic experiences with two other steeks in intricate color work. I used baby ull and the shoulders and upper torsos unravelled as I sewed in the sleeves, despite the fact that I thought I had securely prepared the steeked area. PTSS--Post-traumatic-steek-syndrome--haunted this sweater.
This past week I finally faced my "issues" and tackled the beast.
Here is the torso awaiting dissection. I liked the little faux cables running down the front.
Here is the obligatory photo of the innards. I thought I had done quite well, thank you very much. I hated the thought to cutting into those perfect little stitches, on which I had worked so very, very hard!
In my unwillingness to do the steek, I completely forgot to photograph the entire process. I thought I had, but my camera bears no photos of early steps. Oh well.
Step 1: measure and remeasure and measure again the width of the upper sleeve.
Step 2: locate, relocate and locate again the side stitches of the torso. You don't want a sleeve hole in the middle of the chest! AT least, I didn't.....
Step 3: insert sweater into sewing machine. Realize that sewing down the middle of a navy blue stitch next to other navy blue stitches would cause blindness. Remove sweater from sewing machine.
Step 4: Take some contrasting color sock yarn and sew down the middle of the stitches to be cut. Re-insert sweater into sewing machine. Sew up (or down) the middle of the stitch on either side of the marked line of stitches. Remember previous traumas and sweat profusely. Sew up (or down) the middle of the next line of stitches as well.
Step 5: Remove sweater from machine and pace to release tension.
Here's the cut edge. Not bad.. Very clean--no blood and no unravelled stitches!!
Step 6: Sew up the shoulder seams using the modified whip stitch shown in the pattern book. Dale typically leaves a bit up to your imagination in its instructions. The photo showing the seaming of the shoulders and arms was blurry!!! I didn't know if my shoulder seam was as it "should" be, but it looked good enough.
Step 7: Figure out how to sew the sleeves in. I had two sleeves with five rows of reverse stockinette at the top, which was to form a facing to cover the cut edges of the torso.
OK, right sides together. Ok........ Use lots of pins. I wanted the resulting product to have a neat seam along one line of stitches, following that line from the arm pit, up the arm, over the shoulder, down the arm and back to the pit. But, following navy blue stitches lined up with navy blue stitches resulted in stars before my eyes.
Step 8: Remove the pins and sew a contrasting sock yarn up the middle of the stitch I would be following for the seam. Much better. Blindness averted.
Step 9: Replace the pins, admire the neat rows of tiny machine stitches, and place right sides together. No, that didn't seem to work.
Step 10: Pin sleeve into steeked hole WRONG sides together. And begin to kitchener (is that a verb?) the pieces together.
I hope you can see that I inserted the needle through the body of the sweater just above the contrast thread. That way, I didn't have to pick out the contrast "thread"!!! Nifty, huh?
Here's a shot of the sleeve (on the bottom) going into the armhole, and the five rows of reverse stockinette efficiently being "sucked up" under the torso edge. I used the row of stitching just under the reverse stockinette on the sleeve as the "base" of my kitchener stitches.
Step 11: Admire one's handiwork. Do a little finished steek dance! Ignore stares of family members.
Step 12: sew up the hem of the sweater. See those two itty-bitty yarn over holes in the center of the hem? Those are for the elastic cord that gets inserted to snug up the bottom of the sweater to keep out those cold Norwegian (and Wisconsin) gusts of bitter cold wind and to make the wearer look dashing. A loose sweater bottom is simply unattractive!
But wait, isn't the black cord hanging out of the sweater also unattractive??
Step 13: Research mission. Go to LYS and inspect Dale sweaters hanging on display from the wall. Look at what they do! How clever!
They single crochet a couple of inches of yarn and sew it into the side "seam" (or lack thereof on a circularly knit hand made sweater) and the elastic cord passes through the little loop. Now, why didn't I think of that??
Step 14: Are we ever going to finish this thing??? Pick up stitches for around the neck. Ask husband whether he wants stripes on the neckband, as shown in the photo in the pattern book. Ask husband whether he wants the neck band as high as shown in the photo in the pattern book. Hubby says no stripes. Therefore, knit stripes to be on the INSIDE of the neck band, just for cuteness sake. I was very tired of working only in navy blue at this point. Show hubby the progress. Hubby now asks if the stripes can be on the OUTSIDE. Respond, "No!! It's too late. I'm done with this project!!!
Step 15: Put away the leftover yarn, the pattern book with notes about what I changed in the pattern. Skip the finished sweater dance. Go directly to step 16.
Step 16: Narrow choices for new project for myself!!!! Order yarn!!! Begin swatch!!! Yippee!! Do new sweater project dance!
Look at this handsome, proud man. This is my husband wearing his Dale of Norway sweater that I FINALLY finished. Was the finishing painful? Not really. Was it intimidating? Definitely.
Back in 2006 I gave my husband what I thought was a wonderful Christmas present. I gave him a Dale of Norway pattern and invited him to my favorite LYS to select yarn. Well, he didn't like the pattern I selected ("too flowery" ?????). It took several trips to more than one LYS to select the above pattern and yarn. This was a painful process. He finally selected the winning "daring" color combination: navy blue, dark red and grey. Aren't 98% of men's sweaters done in navy blue, dark red and grey?? But I digress.
I shouldn't berate my husband, however, for the long and painful time it took for him to select a pattern and yarn-- it took me nearly two years to knit the sweater!! We who live in glass houses shouldn't throw stones!!
I finished the actual knitting of the sweater just after Christmas. But, somehow, the steek and other assembly intimidated me. I previously suffered traumatic experiences with two other steeks in intricate color work. I used baby ull and the shoulders and upper torsos unravelled as I sewed in the sleeves, despite the fact that I thought I had securely prepared the steeked area. PTSS--Post-traumatic-steek-syndrome--haunted this sweater.
This past week I finally faced my "issues" and tackled the beast.
Here is the torso awaiting dissection. I liked the little faux cables running down the front.
Here is the obligatory photo of the innards. I thought I had done quite well, thank you very much. I hated the thought to cutting into those perfect little stitches, on which I had worked so very, very hard!
In my unwillingness to do the steek, I completely forgot to photograph the entire process. I thought I had, but my camera bears no photos of early steps. Oh well.
Step 1: measure and remeasure and measure again the width of the upper sleeve.
Step 2: locate, relocate and locate again the side stitches of the torso. You don't want a sleeve hole in the middle of the chest! AT least, I didn't.....
Step 3: insert sweater into sewing machine. Realize that sewing down the middle of a navy blue stitch next to other navy blue stitches would cause blindness. Remove sweater from sewing machine.
Step 4: Take some contrasting color sock yarn and sew down the middle of the stitches to be cut. Re-insert sweater into sewing machine. Sew up (or down) the middle of the stitch on either side of the marked line of stitches. Remember previous traumas and sweat profusely. Sew up (or down) the middle of the next line of stitches as well.
Step 5: Remove sweater from machine and pace to release tension.
Here's the cut edge. Not bad.. Very clean--no blood and no unravelled stitches!!
Step 6: Sew up the shoulder seams using the modified whip stitch shown in the pattern book. Dale typically leaves a bit up to your imagination in its instructions. The photo showing the seaming of the shoulders and arms was blurry!!! I didn't know if my shoulder seam was as it "should" be, but it looked good enough.
Step 7: Figure out how to sew the sleeves in. I had two sleeves with five rows of reverse stockinette at the top, which was to form a facing to cover the cut edges of the torso.
OK, right sides together. Ok........ Use lots of pins. I wanted the resulting product to have a neat seam along one line of stitches, following that line from the arm pit, up the arm, over the shoulder, down the arm and back to the pit. But, following navy blue stitches lined up with navy blue stitches resulted in stars before my eyes.
Step 8: Remove the pins and sew a contrasting sock yarn up the middle of the stitch I would be following for the seam. Much better. Blindness averted.
Step 9: Replace the pins, admire the neat rows of tiny machine stitches, and place right sides together. No, that didn't seem to work.
Step 10: Pin sleeve into steeked hole WRONG sides together. And begin to kitchener (is that a verb?) the pieces together.
I hope you can see that I inserted the needle through the body of the sweater just above the contrast thread. That way, I didn't have to pick out the contrast "thread"!!! Nifty, huh?
Here's a shot of the sleeve (on the bottom) going into the armhole, and the five rows of reverse stockinette efficiently being "sucked up" under the torso edge. I used the row of stitching just under the reverse stockinette on the sleeve as the "base" of my kitchener stitches.
Step 11: Admire one's handiwork. Do a little finished steek dance! Ignore stares of family members.
Step 12: sew up the hem of the sweater. See those two itty-bitty yarn over holes in the center of the hem? Those are for the elastic cord that gets inserted to snug up the bottom of the sweater to keep out those cold Norwegian (and Wisconsin) gusts of bitter cold wind and to make the wearer look dashing. A loose sweater bottom is simply unattractive!
But wait, isn't the black cord hanging out of the sweater also unattractive??
Step 13: Research mission. Go to LYS and inspect Dale sweaters hanging on display from the wall. Look at what they do! How clever!
They single crochet a couple of inches of yarn and sew it into the side "seam" (or lack thereof on a circularly knit hand made sweater) and the elastic cord passes through the little loop. Now, why didn't I think of that??
Step 14: Are we ever going to finish this thing??? Pick up stitches for around the neck. Ask husband whether he wants stripes on the neckband, as shown in the photo in the pattern book. Ask husband whether he wants the neck band as high as shown in the photo in the pattern book. Hubby says no stripes. Therefore, knit stripes to be on the INSIDE of the neck band, just for cuteness sake. I was very tired of working only in navy blue at this point. Show hubby the progress. Hubby now asks if the stripes can be on the OUTSIDE. Respond, "No!! It's too late. I'm done with this project!!!
Step 15: Put away the leftover yarn, the pattern book with notes about what I changed in the pattern. Skip the finished sweater dance. Go directly to step 16.
Step 16: Narrow choices for new project for myself!!!! Order yarn!!! Begin swatch!!! Yippee!! Do new sweater project dance!
Subscribe to:
Posts (Atom)